

How To Draw A Realistic German Shepherd
Thousanderman Shepherds are large and dignified dogs that take for many years fabricated keen companions for humans. They also human activity every bit great subject matter for drawing. Drawing a German Shepherd is good for practicing the application of realism to your art. This tutorial will teach you how to depict a realistic German Shepherd drawing in just fourteen steps!
Tabular array of Content
- one How to Depict a High german Shepherd Step past Step
- ane.one Step 1: Creating the Main Body for Your German language Shepherd Cartoon
- 1.ii Pace 2: Creating the Head for Your German Shepherd Drawing
- one.3 Step 3: Creating the Muzzle for Your High german Shepherd Sketch
- one.iv Stride 4: Creating Ears for Your German Shepherd Sketch
- 1.v Step 5: Creating Front Legs for Your High german Shepherd
- one.6 Step six: Creating Back Legs for Your German Shepherd
- ane.vii Step 7: How to Draw a High german Shepherd'southward Outline
- 1.viii Step 8: Calculation the Fur and Details of Your German Shepherd Sketch
- 1.9 Footstep ix: Adding the First Layer of Colour
- i.10 Step x: Adding the Shading
- 1.11 Pace 11: Adding Some Highlights to Your High german Shepherd
- 1.12 Step 12: Calculation the Adjacent Layer of Color to Your German language Shepherd
- i.13 Step xiii: How to Draw a German Shepherd's Facial Features
- ane.14 Step xiv: The Terminal Step to Finishing Your Realistic German Shepherd Cartoon
- 2 Frequently Asked Questions
- 2.1 What Is the Hardest Part of Learning How to Draw a German Shepherd?
- 2.2 Tin This Same Tutorial Exist Used to Sketch Other Breeds of Dogs?
How to Draw a German Shepherd Footstep by Step
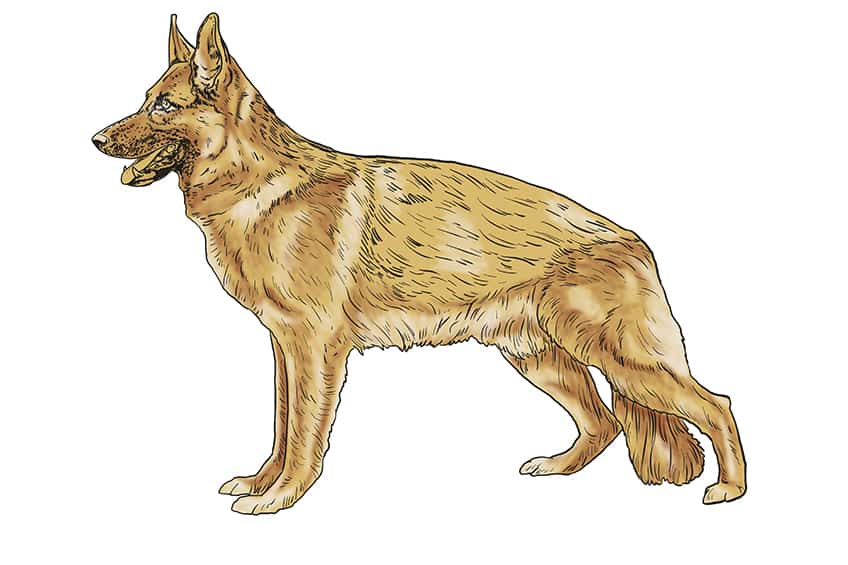
By the end of this tutorial, we volition take covered every step necessary to accomplish an prototype like to the one beneath. German language Shepherds take unique proportions for dogs, with their large ears and back legs that gradient downward from the trunk. Their glaze color is also very distinct. By focusing on getting the coloring and proportions down correctly, nosotros will hands achieve a realistic German Shepherd cartoon. Each person's fine art journey is unique, and so do not exist disappointed if your domestic dog looks slightly different from ours!
These instructions can hands be followed and practical to any medium you choose to use, whether y'all are a tablet artist or prefer traditional paints, you volition notwithstanding exist able to follow along.

Step 1: Creating the Main Body for Your German language Shepherd Drawing
As with our other animal tutorials, we ever brainstorm our sketches by using construction lines to help the states lay out the basic proportions, shape, and size of our animal. We volition offset our German Shepherd sketch by using a large oval shape for the main part of its body. When positioning this oval, keep the finished sketch in heed.
The oval should slant in a way that matches the stance of the canis familiaris. The head is on our left, so that will be the side that is sloped upward. Thus, the correct-hand side will be sloped downward to match the natural direction of the legs.
You will still be calculation other limbs around this primary oval, so exist certain to leave enough room and position the oval in the center of the sheet.

Step 2: Creating the Caput for Your German Shepherd Drawing
The next stride in our German language Shepherd sketch is quite piece of cake and will not take long to consummate. Draw a slightly irregular circumvolve and position information technology only in a higher place the left role of the oval you drew for the body. The irregular shape of the circle is to help with the structure of the head, so keep the left side tilted slightly downwardly. The top and bottom are slightly flattened, and the right side is tilted slightly up.

Step iii: Creating the Muzzle for Your German Shepherd Sketch
If we take a await at the final sketch again, nosotros tin see that the High german Shepherd's rima oris is slightly open. For this next step, nosotros will again apply our construction lines to create the basic shape of the muzzle. First, draw an uneven "U" shape from the upper left side of the caput, out towards the left of the page, and and then back in once more towards the head – this will be the top part of the snout. Now, draw another, smaller "U" from where the last one ended down to the lesser of the head circle. This will create the lower jaw of the dog.

Step 4: Creating Ears for Your German Shepherd Sketch
Their large, upright ears are what make these dogs distinctive from other species. To lay the foundation for the shape, create an "M"-shaped line on the top of the circumvolve you drew for the caput. This shape is like shooting fish in a barrel to draw, merely careful attention should be placed on the direction of the "G", which will bear on the perspective. The part of the "Yard" on the right will be the left ear and will therefore exist closest to usa. The correct ear will exist on the furthest side from u.s., significant that information technology volition be thinner and slightly obstructed from view past the larger one closest to the states.

Step v: Creating Front end Legs for Your German Shepherd
In our example sketch, the German Shepherd is not in motion, and then the front legs should exist together and direct. To create a realistic German language Shepherd drawing, we will want to apply vi lines to create the leg nearest to the viewer and four lines to create the leg furthest from united states of america. From the perspective of the viewer, the furthest leg will be smaller and more often than not obstructed from view past the other leg.
Starting about a fifth of the fashion in from the left side of the body, draw a line straight down. This is the kickoff of the leg closest to united states in our German Shepherd drawing.
From that bespeak, you can draw a much smaller line that extends slightly towards the left of the page. Now, draw another line from the body down to create the leg, and add a semicircle at the bottom to create a mitt. You can divide the parts of the legs with a line.
You can at present add the leg at the dorsum, which is similar to the first one, except that the line will get-go farther to the left. This line then must then extend down toward the dog's right paw by curving gently from the body and downward, following the lines of the other leg.

Pace 6: Creating Dorsum Legs for Your German Shepherd
This step follows similar processes to the last one, but the angles differ and the lines used are more curved. Starting with the back leg furthest from u.s., we volition draw a line that slightly curves inwards, i.due east. towards the border of your page or canvass. Now, draw a brusk line that extends outwards towards the left-hand side, and you volition have created an ankle!
Now, draw some other semicircle for the manus extending from the talocrural joint. Add some other line downward from the torso and connect it to the talocrural joint and paw to cease the leg. For the last dorsum leg, you lot tin can go through the same bones steps, merely ensure that y'all make it more curved and thicker than the other one to create a sense of perspective.
The High german Shepherd is starting to take shape nicely now, and we can motion on to putting on the details to the structure lines!

Step 7: How to Draw a German Shepherd's Outline
In this step, all our previously created construction lines will assist united states to create an outline that follows the shape and contour of our German Shepherd sketch. Starting at the head, depict a line that intersects where the head blocks the dorsum ear.
At present create lines for the ears that are more realistic; add lines to the eardrum and inner ear and add an eye on the side in the appropriate place.
The muzzle's outline tin can exist followed rather closely, but be sure to add a olfactory organ. Once you lot get to the bottom jaw, do non forget to add details such as canine teeth, other smaller teeth, and the natural language of your German Shepherd. You can add a bulge or ii on the bottom of the neck, then extend that line down towards the legs. Trace the legs equally they are, but add brusque strokes to certain parts to create the impression of fur on the legs at the back.

You can deport on using the same strokes to create a hirsuite-looking belly, likewise as tail and back legs. Y'all can and then draw a line from the back of the legs to the top of the caput to cease off the outline of your realistic German Shepherd cartoon. Once all these steps have been completed, yous can accept your eraser and rub out all the construction lines still visible to you.
Pace 8: Adding the Fur and Details of Your German Shepherd Sketch
Here, we are going to bring out the depth and texture of the canis familiaris'due south fur by calculation details to our dog'due south trunk and face. Start by shading the lower office of the dog's nostrils and the lower office of its jaw. Now, around the muzzle, add some curt strokes to create textured shading. Yous can also shade areas of the teeth and natural language. For the final facial details, add some farther shading in the ears and around the eyes of the German Shepherd.
When drawing the fur, it is of import to the contour and shape of your canis familiaris proceed in mind.
Ideally, the hairline should period in the same management that the dog's body does. The fur, for instance, should flow backward from whatsoever direction the dog is facing. On the legs, tail, and abdomen, you tin can draw the fur flowing down. To create a realistic German Shepherd drawing, ensure that the fur on the head is shorter than the fur on the torso.

Step ix: Calculation the Beginning Layer of Color
For the most realistic cease result, nosotros will demand to create depth to our drawing past applying several different layers of shading to our German language Shepherd sketch. We will accomplish a feeling of dimension and depth by starting with a base color and then adding another color layer likewise every bit shading and highlighted areas. Pick a lightish shade of brown as the start base color of your drawing.
This color should fill the entire space inside your drawing.

Step ten: Calculation the Shading
For this part, pick a darker shade of brown to add some dimension to your German Shepherd drawing. Going effectually the fauna's belly, inside its legs, hips, shoulders, and muzzle, add shading with the warmer dark brown colour.

Step eleven: Adding Some Highlights to Your High german Shepherd
Pick a suitably light biscuit color for the highlighting stride. Using a soft-tipped castor, apply the color around areas of the body that would not be in shade and would be in direct sunlight. This would include the top of the ears, the peak part of the dorsum and shoulders, the sides of the abdomen, and even the top parts of the paws.
Step 12: Adding the Next Layer of Color to Your High german Shepherd
The next layer nosotros are going to add together to our drawing is the colour black. This time, we will employ a medium brush, and starting with the head, add together a layer of black around the muzzle expanse. Then, go on down along its dorsum as well as certain parts of the legs and tail. Now, using a slightly lighter shade of grayness, add together some color to the nostrils and parts of the middle and ears.

Footstep 13: How to Depict a High german Shepherd's Facial Features
Here, nosotros volition need some white, brown, and light reddish. Start by adding some ruddy to the natural language and calculation a modest streak of white on the side to highlight it. You tin can as well apply the white to create a small sparkle in the eyes and to brighten the teeth. For the final touch on, color in your German Shepherd's eye with chocolate-brown.

Step 14: The Concluding Step to Finishing Your Realistic High german Shepherd Cartoon
In this very terminal stride of the tutorial, we can stop off our drawing by removing the outline and and then using our paint to add together strokes of fur to trace over where the lines were. Call back to employ the right color associated with whichever area yous are working on. Nosotros want to avoid a single solid outline, merely rather take natural-looking fur.

Well washed on finishing your tutorial on how to depict a German Shepherd! We trust that yous have enjoyed the process of learning how to create a realistic German Shepherd drawing, footstep past step. Practice not feel discouraged if your sketch doesn't look exactly the same as ours – it takes practice to get all the dimensions right. But until so, savour the experience of learning something new!
Oft Asked Questions
What Is the Hardest Role of Learning How to Draw a German Shepherd?
For the most part, this tutorial is quite like shooting fish in a barrel and straightforward. The confront and fur of a German Shepherd drawing are probably the most fourth dimension-consuming due to the level of detail required to make them expect realistic. However, past following this tutorial, y'all will detect it simple plenty to follow the steps needed to create a realistic German Shepherd sketch.
Can This Same Tutorial Be Used to Sketch Other Breeds of Dogs?
Yeah, y'all tin can still apply the aforementioned gear up of guidelines to draw other types of dogs. All the same, each breed of dog is distinct, and so you lot volition want to brand sure that you comprise the correct proportions and angles applicable to the type of dog you desire to draw.

Source: https://craft-art.com/how-to-draw-a-german-shepherd/
Posted by: erwinwhold1959.blogspot.com
0 Response to "How To Draw A Realistic German Shepherd"
Post a Comment